Home

Wednesday, October 31, 2012

It's My Turn

That's right, it is my hop day on the Let's Get Acquainted Blog Hop.

Plum and June


If you are new to my blog, thank you for stopping by.  
If you have been here before, I hope you enjoy learning a little 
bit more about me. I've included a few things 
I've worked on and a tutorial starting at the end of the post. 

My name is Wendi and I live in California. My husband and I have 
three grown daughters and three grandchildren. I enjoy quilting, knitting and creating things. 
I find it hard not to have something in my hands to do.

These are a few of things I've enjoyed making.


Question and Answer Section

Quilting - I've been quilting for about 20 years. I love the geometry and the precision.  I still have so much to learn, especially in the free motion quilting area. I haven't been able to master those uneven tension issues. I love both tradition and modern designs. Even though I have been quilting for a long time, none of my quilts reside in my home. I have a goal to finish a couple for our home within the next year.

Favorite quilt techniques - I love to applique. It's portable and relaxing.

Favorite quilting tips - Cut as precisely as you can and chain piece when possible.

Fabric wish list - No specific fabric line right now, but my fabric stash is lacking in grays.

Favorite craft or quilting book - I love books. Right now I am learning to knit socks, and I find
Toe-Up 2-at-a Time Socks by Melissa Morgan-Oakes to be very helpful. I don't have a favorite quilting book right now.

Binding by hand or machine - Hand. Always. I find it relaxing.

Favorite TV show when stitching - Big Bang Theory or a chick flick.

Before heading to the tutorial, I want to say thanks for stopping by my blog. 
I hope you'll stop by again real soon. 
Don't forget to head over and say hello to 
my blog hop partner, Kelly of Live. Love. Create. 


On to the tutorial

My tutorial for a chevron quilt turned out to be two parts. 
Part one is in the post below and part two will post on Saturday.


Chevron Layer Cake Quilt

Part One


Chevron Layer Cake Quilt

Finished size  49 X 68


I use a layer cake I had on hand to make this chevron quilt. 
I wanted the chevron strips to be the length of the quilt and not an actual block. 
I also wanted it to be a generous lap size so I "framed" the strips to add length,  
thinking the layer cake alone wouldn't make it long enough. I have found that the frames weren't needed, the layer cake would have made a generous lap size without them. 


 Part One - Fabric requirements, cutting and making rows (left side).
Part Two - making rows (right side) and assembly of quilt top


Here is my version. 

Lets start off with what you'll need.

1 layer cake (10 X 10 pieces of fabric)  - you will use 35 squares

1 1/3 yards of framing fabric (mine is a white print)

1/2 - 3/4 yard for binding

If you don't want borders, 1/2 yard will be enough for binding

A rotary cutter, cutting mat, long ruler (at least 24") and a second ruler is helpful.


Let's Start Cutting


Cut each layer cake square into 4 strips 2 1/2" wide.  I cut mine in half, then in half again.


From the frame fabric, cut 45 strips 1" wide by the width of the fabric  (yield 45 strips 1" by about 40")

** Before you cut your strips, make sure to straighten the edge of your fabric to avoid any crooked strips. I use two rulers. Fold your fabric in half, selvedge to selvedge, then again. You should have 4 layers. Place the horizontal line of one ruler along the bottom fold, near the left edge. Place the second ruler, on the left side, up to the edge of the first. Remove the first ruler and trim. Your edge should now be nice and straight. Perpendicular to the fold. 


Lay out your layer cake strips into six rows.  Each row should have 23 strips.
Move things around until you are pleased with the layout.


  Let's Get Sewing


Collect the top 7 strips from row one into a stack. We will split the row of 23 into smaller units.
Seven or eight is a manageable size, any longer and things get distorted. The smaller stack works best with the ruler length too. You could do 4 group with 5 and 6 strips, if you prefer.

At your sewing machine, put the top strip aside and sew the next six layer cake strips to your 1" frame strips. Four printed strips should fit on one strip of frame fabric.  Continue with the rest of the layer cake strips in the stack, so that each one has a frame fabric attached. Cut them apart and iron the seams open.


Keeping all your strips in order, and with the frame fabric up toward the top,
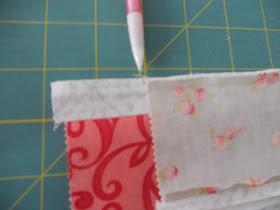
mark each framed strip 1 1/2 " in from the left side.


 Line the fabric above at the 1.5 inch mark, pin and sew strips together.


 Press seams open. Continue pairing these four strip groups, using the 1.5 inch marked sewing guide until all 7 strips are one larger strip unit. It should lean to the right. Press.


Time To Cut


Line up the 60 degree line along the bottom of the lower strip.
The side edge of the ruler should fall along the strips where they join.
It could be off a bit, mine was, just straighten as best you can.
You can use another ruler. Lay the 60 degree line of the second ruler along the side edge of this one, your frame fabric lines should run along the horizontal lines of the ruler  (Sorry, no photo)
When you are ready, carefully cut the long edge.

 60 degree line


Long edge


Now move your ruler over to cut the other side. Again placing the 60 degree angle on
the bottom edge. Place a second ruler along the cut edge, and butt the rulers together.
I placed my second, smaller ruler on the 1 1/4" mark, placed the long
ruler against it and cut the other long edge.
My strips ended up being 6 3/4 wide, from edge to edge straight across. The width doesn't really matter, you just want each chevron half strip to have the same measurement.
These edges are cut on the bias, so be very careful, they will stretch easily


One small unit of the chevron half section is done. Set this unit gently aside. Now collect the next 8 strips and repeat the process for unit 2 of row one chevron half.  Then the next 8.

Now you should have 3 sections of trimmed units.  Each unit containing 7 or 8 fabrics. Let's sew them together.  Line up the edges, off set by 1/4 inch so the long edges will line up nicely. Stitch and gently pressing seams open.  This chevron half strip should measure about 63. Gently lay this very long, strip aside so it doesn't stretch.


Congratulations,  you have one half of the chevron strip #1 done. Now go back to your quilt layout of 6 rows and repeat this process with row3 and 5.

Now we are ready for part two. I will post it on Saturday.

Friday, October 26, 2012

Yay, Its the Bloggers Quilt Festival


When the Festival rolls around I usually only have one or two quilts to choose from. 

Today I will show you my Kaleidoscope Quilt.  

I started out making this quilt for our family room, 
 but once I got sewing it together I realized it was really meant to be for my youngest daughter. 
I love when that happens, or even when one quilt sparks inspiration for another. 


I've always loved the kaleidoscope block and all of its many variations
and it was perfect for showing off the large scale prints of Kate Spain's Fandango line. 


quilting close-up
This is the most I've ever quilted a quilt and it was done on my home machine.
 I was really, really glad when it was done and about half 
way through I was wondering what I was ever thinking. 

pieced back
You can see the quilting design better here from the backside.


 I love this quilt. 
I love the fabrics, the colors, the pattern 
and it's special to both my daughter and me. 


Blogger's Quilt Festival Stats
Name - Samantha's Kaleidoscope
Finished Size  - 50.5" X 67.5"
Pieced and Quilted by - me
Best Category - throw quilt and home machine quilted


Thanks so much for stopping by.  Enjoy the rest of the Quilt Festival!


--- Wendi  


Monday, October 22, 2012

Hops and Scraps


Lets Get Acquainted Blog Hop is still going on. 
Actually, it is due to come to an end in a few weeks. 
I'm posting this weeks hop blogs so you can stop by and say hello. 

Oct 23       Tracey from The Peony Teacup
        Megan from City Stitches

Oct 25            Kerstin from Sunset Sewing
                                                         Jenniffier from Jenniffier's Sometimes Creative Life


After recent projects, I was tidying up my sewing room 
space and made the mistake of 
collecting my scrap bags and baskets in one place.  

Oh.....I   can   not    believe that I can't bring myself to toss out these scraps. 
Why must I keep everything!  

Want to see?


I've had this basket for many years, 
 as if it were actually a piece of furniture. 


A plastic bin to toss scraps right at my feet while I'm cutting. 


Last year I got some crazy idea to hang onto strings. 
I needed some for a project and didn't have any.......because I don't like to do string things!  


And these, the tiny of tiniest, but oh so cute and pretty!  
Some of these are only an inch big.

What to do, what to do?  I tried cutting up everything in a 2.5 inch 
square for a scrap vomit quilt, but so many of the scraps are not wide enough. 
Should I just toss anything smaller than say, 2 inches, and cut up the rest?
Suggestions anyone? 

Do you keep all your scraps too?
What do you do with them?

I forgot, I have another large shopping bag full, that I didn't take a picture of. 
Ugh!  I think I need a plan!
Or some help!  : )


Friday, October 19, 2012

DOLL QUILT SWAP

I'm back, I had ten days to finish my partners 
doll quilt for a swap, I got it done and mailed.  
I don't think my partner has received it yet, but look what I got!!  


Isn't she a beauty?! 


I love this little doll quilt, 
and received it from Caitlin of i don't do dishes.
She did a fabulous job!
I love all the color and color combinations, the small piecing and her attention to detail! 

DETAILS - She is a dainty 14 X 14,  
and features fabrics from Denyse Schmidt, paired with white. 

Very soon she will be hanging on the doll quilt wall along side my other Doll Swap beauty.
They will go together very nicely. 

A big THANK YOU Caitlin!


Here is a glimpse in progress of the quilt I sent to my partner. 


My partner likes traditional, so I went with 20 different 
Denyse Schmidt prints for a double pointed dresden.  


I'm not a fan of white.  I just don't like working with it, 
so I went with a gray, which I thought made the blades pop a little. 


Here it is, all quilted and bound. 
It is more quilting than I usually do and at first I didn't like it, 
but the more I looked at it, the more I liked it, 
and before I sent it, I actually loved how it turned out. 

 Hopefully my partner will too!


 I had time to make a little dumpling in my partners favorite color, pink. 
I had been wanting to make one, so the timing was perfect. 


Since this is a swap featuring DS fabric, I went with DS scraps.

The only zipper on hand the right size, was a blue one,
so I went with a blue lining. 

This little dumpling pouch was easy and fun to make,
I will definitely be making several more.

Now that this swap is over, I can get back to that ever
growing list of  Works in Progress and things I dream of making. 

Happy Stitching  : )


Thursday, October 4, 2012

Works in Progress - Short List

Summer fun hasn't ended here, 
so I am having trouble getting to all my unfinished projects.
Then there's new projects and new fabrics spinning around in my head. 
It makes me a a bit fuzzy and a little slow.  
Do you get that way too? 


As a way to stay focused, here is a short list of works in progress.
My entire list is quite long and scary : )


I was so very happy with my first Doll Quilt Swap that I joined another.
This one  is dedicated to using Denyse Schmidt 's fabrics
I've stalked my partner and at this point I have ten days to get it done.


My partner likes traditional,
so I went with 20 different double pointed blades.
Hopefully it will be something she loves.


I've started another kaleidoscope quilt.
This one is a special request.
The request was for reds, burgundies, greens, and tans all put together with brown.
It was really hard finding fabric that didn't look like Christmas,
but I think I found it in Tapestry by Fig Tree.
This fabric is beautiful and hopefully will be just perfect for this special quilt.
Oh, and it's requested to be queen size,
which I can't quilt on my little machine.
I will have to send this one out to be quilted.


Isn't this going to be beautiful?!  I just love it.


Have you all be following the Let's Get Acquainted Blog Hop?
I will be one of the featured blogs on November 1,
so I'm working on my tutorial for that day.
Well, I'd show a photo, but its still all in my head,
and I have nothing but fabric & quilt dreams to show for it.  : )


I still have the triangle quilt (leftovers from fandango kaleidoscope)
needing a back and quilting.
Before I get to the backing and quilting,
I'm going to add a 4 inch border to the top and bottom, just to ground it a bit.


My Man quilt needs to be a little larger, than get it's pieced borders.


I have so many works in progress that I must stop here.
Call it denial, but it works for me. : )

If you have a minute, stop on by the Let's Get Acquainted blogs
and get to know a few more bloggers.

  October 4               Catherine from My Life in Binding
                      Patricia from Quilting Lines

October 9              Amy from Sew Incredibly Crazy
                         Foster from Foster Reviews It


Happy Stitching!