
Part One is Here

Now that we have the left side rows done, lets get to the right side.
These are done the same way as the left, in part one, except you will place your mark differently.
Start by adding a frame to each strip top. Press seams open. Place the mark 1 1/2" in on the right side of the strip, so it will lean the other way.

Once your units are complete, they will lean toward the left.
Trim them in the same manor as you did the right leaning ones in part one.

Continue making units, then rows to complete chevron rows 2, 4 and 6.

You know have 6 very long rows, 3 left side and 3 right side chevrons.

Take your 6 rows, 3 left side and 3 right side chevrons.
Sew the left side and right side of each chevron together very carefully,
so as not to stretch the bias edge, lining up the frame fabrics.

Gently press the long chevron seams open.
Repeat this for the other four chevron strip halves.
You should now have 3 complete chevron strips.

Lay your chevron on the floor and measure down the center.
Your center seam measurement should be the same as the outer edge measurement. Mine was 66".
Join two frame strips together to match the length of the row. 66" in my case.
Attached the frame strip to the right edge of chevron strips #1 and the right edge of chevron #2.
I used my walking foot because of the bias edge.

Now lets sew the left side of chevron #2 to the right side of chevron #1.
Lining the second side of the frame strip and chevron together is a bit tricky.
The chevron seams won't line up because of the 1/2" strip between them.
Place the chevron with the strip already attached, on top (no photo).
You will notice that the seam line of the top chevron strips will fall right in the middle of the frame strip of the other row (hopefully this will make sense when you do it) It really looks like it won't line up properly, but pin a bit and gently take a peek. I think you'll see how they fall together.
Pin well and if possible use a walking foot. Press seams toward frame fabric.
Now repeat the same process for chevron #2 and #3.
It's time to trim the top.

I placed the chevron points at the 1 1/2 mark and with the ruler straight on the sides, I made my cut. I carefully moved my ruler along the width of the quilt top. It worked, but it might have been easier, space wise, to trim earlier.

Carefully move the ruler along the width of the quilt top and cut. Repeat for the bottom of the quilt.
Finally, we are ready for the borders.
Cut 2 frame strips for the each side and the 2 strips for the top and 2 for the bottom. Sew them together to make them long enough. attached side and top/bottom frame border and Press.

Cut the outer border. Mine is cut at 3" wide. Attach. Sew and press. (No photo of the border #2).
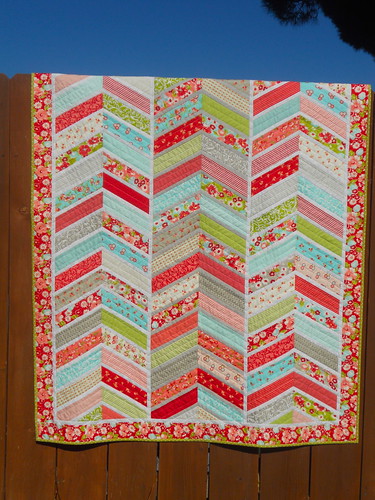
Now you have a finished chevron quilt top. Isn't it beautiful?!
Hooray for you! Layer and quilt as desired.
Here's mine. It finished right about 49 X 68. A pretty generous lap size, which is what I wanted.


So Pretty - I love this fabric
I will be getting to the layering and quilting very soon and will update this post with a completely finished quilt when I do.
If you find any area of the tutorial lacking, please let me know and I would love to see any quilts you make using it : )
Whoo Hoo, another completed top!
The Completed Quilt
So pretty!!! Love the fabric and the chevrons! Perfect match!
ReplyDeleteBeautiful! Reminds me of a quilt my bee mate Cindy (Hyacinth Quilt Designs) made. I love chevrons!! Thanks for the tutorial too!
ReplyDelete